Dubber's Tips and Tricks
How many programs do you have on your computer? Do you have so many that you have forgotten what some of them are? Have you
downloaded specialised programs for each thing that you do with your computer?
=========================
Tip #1.
Use the full capabilities of the programs that are already on your computer.
=========================
Here is an example. Let's say that you want to save a picture of a nice looking web page, so you can copy...er ... modify
the design later for your own web page. Anyway, for whatever reason, you want to take a "Screen Capture" or snapshot of a
web page or part of it.
What do you do? That's right. You head off to NoNags or WebAttack and download a "Screen Capture" utility.
Heh, Heh. There are tons of them to choose from. So you pick the snazzy, multidimensional, super duper 10 megabyte deluxe
jobby.
Sure enough, it works great, after you get it all configured and barely succeed in not letting it take over your entire computer.
"Well, dubber. What's wrong with that?", you may be asking.
What's wrong is that Windows comes with a perfectly good "Screen Capture" utility.
Try this: Press the "Print Screen" key on your keyboard. Open "Wordpad". Click "Edit". Click "Paste".
That's it. Four easy steps and you are looking at a "Screen Capture". No hunting for a freeware site. No Download and Install.
No cluttered up Program menu.
Yeah,Yeah, I know. Wordpad won't do anything to your picture. It won't save it in a hundred different formats or change the
size or color.
But, it will capture a screenshot quickly and easily.
This is just one example of using Window's built-in programs to do your work instead of using 3rd party programs.
The newer your Operating System is, the more likely you will succeed in just using Windows without very many 3rd party programs.
An example is the built-in "On Screen Keyboard" in Windows 2000. If you want an On Screen Keyboard in Windows 98, you will
have to use a 3rd party utility .
To sum up:
Know what your computer can do. Stop downloading and installing unnecessary programs.
Click for More Dubber's Tips and
Tricks Are you tired of having to strain to read really
small type? There are many websites with small type like this. If you are using Internet Explorer you can click on "View",
point to "Text Size" and click on "Largest".
But sometimes that won't work. Makes you want to reach right through that modem and slap a website designer upside the head,
doesn't it?
=========================
Tip #2
To be able to read small text, have Internet Explorer ignore font sizes specified by web pages.
=========================
Here's how you do it. In Internet Explorer, click on "Tools", click on "Internet Options", click "Accessibility", check the
box next to "Ignore font sizes on web pages". Click "OK", then click"OK" again.
Go back and read the text in the first part of this tip. Heh heh. Not hard to read now, is it?
Of course, some pages
will not look right and even jumble their letters. In that case, go back and uncheck "Ignore font sizes specified on web pages".
One of the handy features of the Windows operating system is the ability
to use a right click popup menu to move things around by using the "Send To" option.
Just hold your mouse cursor over an object on your desktop and press your mouse's right button.
Move your mouse cursor over(point to) the "Send To" option on the menu (list) of options that appear.
Another menu(list) will appear giving you several options to choose from.
By default Windows has a 3 1/2 floppy (A), a Desktop (create shortcut) and maybe a few more "Send To" options.
You will want to add more to this "Send To" list as you go along.
I have 12 items in my "Send To" list on this computer.
And it's not that hard to do.
The only problem is that it quickly becomes tedious having to go through the same process every time and you will find yourself
wanting an easier way to add something to the "Send To" list.
Well, you can set things up so you can add an item to your "Send To" list with just two
clicks.
========================
Tip #3
Put a "Send To" shortcut in the "Send To" right click menu so you can expand your right click
"Send To"
option list with two clicks.
========================
Another thing about the Windows operating system is that there are at least a half dozen ways of doing amost any task. I'll
show you the way I like to add a "Send To" shortcut to the "Send to" list.
Here's how:
Click on Start.
Point to Find or Search with your mouse cursor, depending on which operating system you are using.
Next, click on "Search for" or "Find" "files or folders" to bring up the Search or Find Results window.
Type "Send To" in the Search or Find field(little window).
Click on "Search Now" or "Find Now".
Find the "Send To" folder listed in the Search Results.
(If case you can't locate the "Send To" folder, it may be hidden. To unhide it, right click on "My Computer", click the "Explore"
option, click "Tools" or "View" depending on your OS, click "Folder Options", click the "View" tab, enable "Hidden files and
Folders", click "Apply" and "Ok". Close "My Computer".)
Right click the "Send To" folder.
(If you are using an NT-based OS such as Windows 2000 or XP, you will have to be careful to pick the correct "Send To" folder
from the several that are likely to be displayed.)
Now point to "Send To" and click on the "Desktop (create shortcut)" option in the menu that appears.
Click "Yes" on the window that pops up with this message: "Windows cannot create a shortcut here. Do you want a shortcut to
be placed on the desktop instead?"
Right click the "Send To" shortcut that's now on your Desktop.
Click on "Cut" on the "Send To" popup menu.
Go back to the "Send To" folder in the Search Results window and right click it.
Click on "Paste" on the "Send To" folder's popup menu.
Close the Search results window.
Now, when you want to add a shortcut to your right click popup "Send To" option, it only takes two clicks.
Right click the object you want to add, point to "Send To", then click on the "Shortcut to Send To" option.
Enjoy!
It seems that almost every new computer program is not satisfied with doing just one thing.
Firewalls have to be downloaders
and antivirus programs, too. Antivirus programs are firewalls and downloaders, also. Life is not so simple anymore. It takes
a genius to figure things out. So, what do you do?
=========================
Tip #4
RTFM. That's "Read The Flipping Manual".
=========================
Today's tip was authored by "Spezi" in the forum at PC911:
I think the main thing that gets most PC users into trouble including myself is plain old everyday lazyness in so far as reading
instructions goes.
I've learned the hard way finally to pay close attention to detail when reading instructions as
little tidbits such as compatibility with ones particular operating system is of utmost importance.
The particular
sequence in which some items need to be installed also rates quite highly and can be quite a problem when ignored.
Time
and stress saving information pertaining to patches, updates etc can often be gleaned by going over the readme of unfamiliar
programs before attempting installation of same.
Even by adhering to these principles I still find enough hurdles to overcome at the best of times but at least I've done my
best to ward off needless encounters with computer gremlins.
Would you like to be able to find almost anything on your computer in just a few seconds? Without leaving your desktop?Without
having to search in 10 different places?
=====================================
Tip #5
Use the "Desktop" Toolbar for easy access to almost anything on your computer.
=====================================
The more you use the Desktop toolbar the more you will like it. It puts everything in your computer in a Popup menu that you
have to see to believe.
Here's how you do it:
Right click an empty space on your computer's Taskbar. Point to "Toolbars" on the menu that pops up. Click on the "Desktop"
option in the next menu.
If the "Desktop" option is not listed, Click on "New Toolbar". Click on "Desktop" in the
"New Toolbar" window that appears."Desktop" should now be in the field window just to the right of "Folder:". Click "OK".
Now you have a "Desktop" Toolbar in your computer's Taskbar. The last step is to crowd that "Desktop" Toolbar all the way
to the side of the Taskbar.
Place your mouse cursor on top of the "Toolbar Divider". It will change into a "Double-headed" arrow as shown in Illustration
#1 below.
Now, left click and hold down the mouse button and slide the "Toolbar Divider" all the way to the right as shown in Illustration
#2 below.
Illus. #2: Finished "Desktop" Toolbar.
Next, left click the "Double Arrows" and a "Desktop" menu will pop up. From this menu you will be able to access almost everything
in your computer. Give it a try. Spend a little time exploring the "Desktop" menu. I think you will be pleasantly surprised.
I have about 4,000 Favorite sites gathered over the past few years. I have done like everyone else. I divided the Favorites
into groups and put these groups in Folders to easily access what I am looking for. But, as time went by , even with folders
within folders, there were still too many folders. I still had to scroll up and down the Favorites folders to find what I
was looking for. Geez, what to do with all these Favorites?
=====================================
Tip #6
Use the Internet Explorer "Links" bar for easy access to your Favorites.
=====================================
Here's how you do it: Open Internet Explorer. Look at the top of the screen and see if there is a "Links" bar. If you don't
have a "Links" bar: Right click almost any empty spot on the Address or Standard buttons bar. A menu will pop up. Point to
"Links" and click. A check mark will appear next to "Links" in the menu and a "Links" bar will appear. Grab the "Links" bar
divider, as you did in Tip#3, and drag it down until it is by itself at the bottom, as below.
Illus. #1: New, empty
Links bar.
You will notice that Windows, in its infinite wisdom, has included several items on your "Links" bar. I right clicked and
deleted every one of them. You may or may not delete them. It's your call.
Now we get down to some serious decision-making. You have to decide what Favorites you actually want to have handy with easy
access.
I decided that I wanted the following folders on the "Links" bar: Arkansas, Audio, Bios, Computer, Chat, Dictionaries,
Education, Email, Jokes, Link , News, Radio, Search Engines, Software.
How do you get a Favorites folder onto the
"Links" bar? The hard way is to go through the Organise Favorites. Here is the easy way: Click on Favorites. Left click the
folder you want, hold the mouse button down and drag the folder to the "Links" bar. When you see a black vertical bar, let
go of the mouse. Keep dragging and dropping Favorites until you move all the Folders you want to move.
You will find
now that you don't have room for all the items on the links bar, as below.
Illus #2: Links bar with original names.
You
can make room by renaming each folder with an abbreviation, one letter if you can manage it.
Just
right click the folder, click "Rename" in the menu, type the new name in the popup window and click OK.
When you are
finished renaming the Links bar will look as below.
Illus. #3: Links bar with abbreviated names.
You
can see that you now have plenty of room left over.
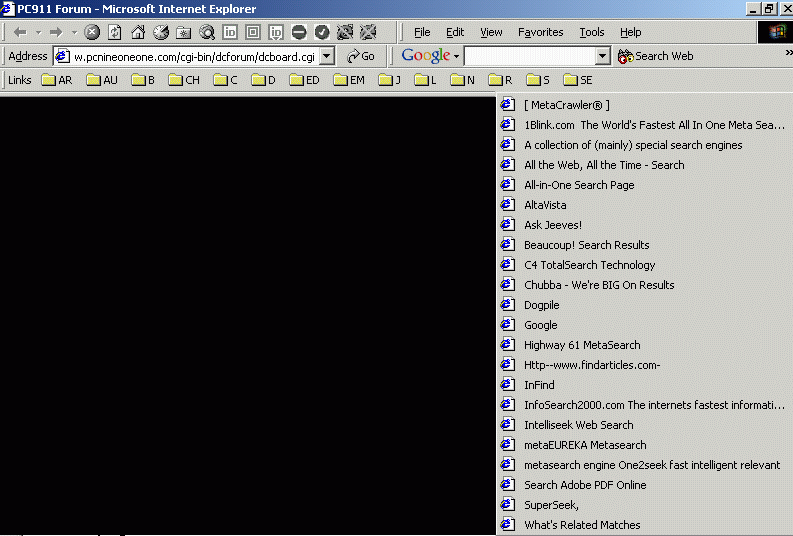
Now let's suppose you want to access your Search Engine Favorites. All you have to do is click the SE in your Links bar and
a drop-down menu will appear with all your Search Engine Favorites as illustrated below.
Illus. #4: Links bar with
Search Engine Drop-Down menu.
Just click on the one you want.
Connected to my computer is a Microtek Slimscan C3 scanner. Installed along with the scanner was 100+ megabytes of Ulead software
to be able to actually scan a photo. It was a really steep learning curve learning how to coordinate all these programs.
Our friend Irfan Skiljan has been giving away a great image viewer and editor by the name of Irfanview (about 800 kb) for some years now.
Irfanview can operate your scanner for you. Scan and download a photo in two steps.
=========================
Tip #7
Use Irfanview to scan and download a photo in two steps.
=========================
Today's Tip was authored by Lackosleep:
I am posting this in case there is anyone still suffering with their scanner software and ridiculous proprietary file types.
Open Irfanview, from the file menu click Select Twain Source and select your scanner as the default source.
ALT + F + A will pull up the scanners scan manager.
Scan away.
In Irfanview hit ALT + F + S to open the Save
dialog box and save it WHERE you want in WHATEVER file type you want. Irfanview will remember the filetype and location for
the next scan so you won't have to choose each time. I haven't tried it with all scanners, but it has worked with all I've
tried so far.
The keyboard shortcuts really cut down on overall time for large scanning jobs, and by
saving it in the format you want at
the beginning of the job you'll avoid the long conversion process from within the program
that ships with your scanner.
This process is also possible with Xnview and many other graphics viewers but the steps
may differ.